Thoughts, ideas and memories of photography, cooking & the outdoors (not in that order!)

Latest

Key Lime Pie Gose

For my second brew, I wanted to attempt something similar to Westbrook’s Key Lime Pie Gose which I had the pleasure of enjoying this past summer.  My goal was to brew this and have ready for the wedding…  given how hot the summers can be in mid-July, it seemed appropriate.

I didn’t make any significant changes to the brewing setup, asides from a few learning lessons on the previous batch.  The biggest of these was fermentation temps, since I didn’t have a way to control the last patch came out way more estery then is typical for a stout – not what I had in mind.   I also wanted to pay closer attention to the sparge amount and total volumes used, trying to not come up 1gal short again.

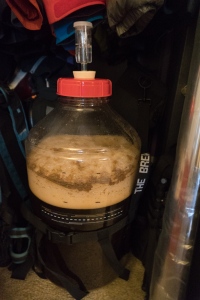
However, the gose recipe was my first non-kit, semi-custom recipe.  I found a few examples online, and based most of mine off of one in particular with a few minor adjustments.  Thankfully, this one did follow a particular requirement – since this was my first attempt at a “sour” and planning to serve at the wedding (gasp!), I didn’t want to play with the unknowns of kettle souring or even less-predictable, a full-on souring in primary.  The recipe called for cheating with additions of lactic acid at bottling, rather then using lacto.  I figured with a gose and significant lime additions these factors would be somewhat overshadowed and less of a concern.  I also did follow the idea of making a zest tincture, but instead of adding key limes to primary I juiced fresh ones and added at bottling – lest we have any flavor escaping with the CO²!

Overall, it came out fairly well.  I still had problems with low volumes, problems with the pump priming caused loss of wort again (I have since built a mount for the pump to hopefully alleviate this).  I added a bit too much salt at bottling, since I did it to taste.  And it was a bit higher ABV then I had planned; I grabbed additional acid malt to help lower the pH in mash and accidentally added the full pound.

But my biggest surprise was the fact the key lime flavors were extremely subdued after bottle conditioning for only 2 weeks.  It was certainly present, but not nearly as obvious as I was hoping for, compared to tasting at bottling.  But still good.  I was also more careful with ferm temps, even without a control method I made sure to cool the apartment down another 5-7 degrees to compensate.

I’m planning to brew another recipe and bring it along to the wedding, why not?  This one will be an NE IPA, but purchased from a kit and this time with a way to control the fermentation temps.

Hopefully it will come out well!  I’m thinking about longer term brews for the fall and winter next, a cranberry pumpkin autumn brew and a big winter (maybe chocolate) Russian Imperial sound tasty.  And of course, I’d love to start a real sour soon as possible considering how long they take!

Operation PNW

The winter, fall and spring months this past year have been very busy between the coming home, the holidays and then interviewing.  There were a number of interesting roles I found, and ultimately accepted an infrastructure engineering position up in the Seattle area during the spring.  This decision is obviously caused the chaos to continue with living-out-of-a-duffle-bag routine for a bit longer, but now I’m settled and mostly unpacked in a permanent location.

As much as I’m already missing the California beauty (figures Tahoe and a Yosemite valley get good snowstorms after I leave!), there is a lot to offer in the region up here.  Some my favorites in previous visits include the beautiful, rugged Olympic coastline, temperate rainforests and of course the famous wildflower blooms on Rainier.  I’m particularly partial to the latter, so really looking forward to the next month or two as the winter snows melt out.  And to much of my surprise, there was an entirely unknown-to-me National Park up here as well: we camped at North Cascades NP last weekend and were thoroughly impressed with the place.  It’s quite steep and intense terrain, especially in the high country (and still snowed in currently), but with easier access then the Sierras.  Doing a bit of quick Googling revealed a plethora of high alpine lakes and stunning vistas available.  Definitely looking forward to exploring all of these places more.

Beyond that, I’m actually looking forward to the colder climate.  Some (many?) people think I’m nuts, but I miss having snow where I live, rather then having to drive hours to find it.  And as a result, I can grab my snowboard and be on the slopes within 45 min.  I would routinely go boarding on winter weeknights back east when I was first learning. After going up to Snoqualmie Pass on several mid-week visits this winter, it reminded me how much I missed having access to this!

My original plan when departing the east coast was to move up here. I wouldn’t change that decision, but happy that I finally was able to make this happen!

Homebrewing Adventures

I’ve been a big fan of both cooking & craft beer most of my adult life. Combining the two seemed like a natural fit for a hobby. While my few early attempts were successful, they were fairly basic with an extract & specialty grain approach; the beer was drinkable but nothing memorable. This was several years ago and ever since I’ve been wanting to try again, aiming for better results.

I have a few friends who are in the hobby as well, and after sampling some recent brews and finding new solutions to old problems, it reinvigorated my desire to get my hands in it again.  The next step up (sort of) was to do an all-grain brew.  Lots of limitations and decisions were part of this process:

  • How do I an all-grain indoors in an apartment?
    • Carefully…
  • Will my stove be able to maintain a boil with 8-9 gallons of wort?
    • As I expected, not without help!
  • If not, what else I can do?
    • Brew on the sidewalk with propane
    • 240V induction cooktop
    • Or a heatstick – I went with this approach and used a DIY 1500W heatsick, which worked rather well
  • What kind of mashing techniques do I want to try?
  • How do I cool the now-much-larger volume of wort without wasting a ton of water?
    • I went a bit overboard and got a large 50′ copper wort chiller with a re-circulation arm and pump
  • And perhaps most importantly, what styles do I want to try?  Previously I just focused on IPA’s which is mostly what I drank at the time.  Now I want to do sours, saisons and interesting stouts (chocolate, coffee, pepper).

I made my first all-grain batch last weekend, it was a simple stout recipe.  The process itself will take a bit getting used to I imagine, all-grain is definitely more complex then my extract and 4gal soup pot but I think the results will be worth it.

This slideshow requires JavaScript.

The brew itself seemed successful more-or-less.  The gravity was quite a bit higher and then expected, and I only obtained 4gal in the fermenter after the boil… I topped off with another gallon of sanitized water to compensate.  Fermentation was vigorous at first, then died down after 2-3 days.

20180102-0941-_DSC8172-

I’m now deciding what to do next.  Leave it in primary for another week, then bottle?  Rack to secondary?  Rack to secondary with some coffee & cocoa nibs for a few days…?

These are two bottles I have sitting on my shelf from beers I love, oddly enough my local shop has kits for clones of both but these are relatively advanced brews, maybe one step at a time?

IMG_20171218_223326


Thanksgiving Wrap-Up

20171119-1651-_DSC0585_DSC0588_DSC0591-
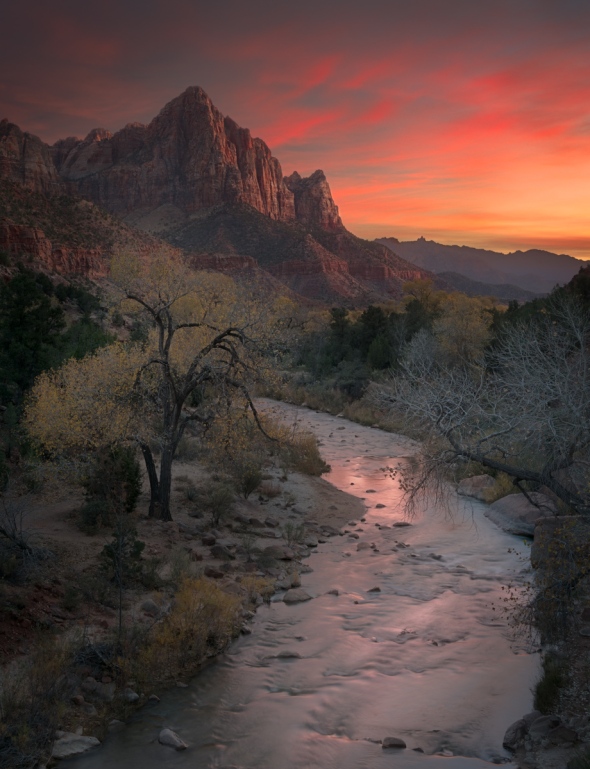
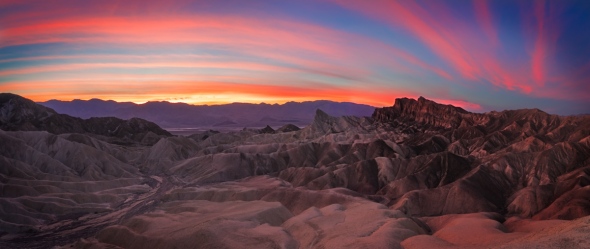
It’s been a few weeks now since finally home.  The Death Valley & Joshua Tree visit over Thanksgiving was awesome, but that’s about it for the travelling in the near term (except for Tahoe of course, assuming we will actually get some snow).  Death Valley was quite an adventure, starting with a sandstorm blowing in as we were pulling into camp.  Glad I had the Anjan with me, it was so fierce that I “slept” through an night, while a nice layer of dust was collecting on my face and small dunes were growing inside the tent.  I don’t even think the REI would have survived long-term after 110 evenings this year, and even if so, it would have been even more uncomfortable.

The rest of the time in DEVA was pretty awesome, great weather and even some pretty impressive sunsets & rises. It was my second time in the park, though the first was just a few hours at the Ibex Dunes with a severely swollen ankle and lots of pain back in March.  JTree was equally awesome.  Got a bit of outdoor climbing in, introduced to a number of famous routes and even managed to get up a 5.9 which is way above my usual outdoor level.  On top of that, I dare say that the sunsets there were even better then DEVA, at the minimum more numerous.  This Joshua Tree visit was also my second time to this park, and likewise the first consisting of a few hours just hiking near trashcan rock.

Beyond that, it was great to see some friends and finally experience the CHAOS Thanksgiving excursion.  And it was a great opportunity to test some higher-scale recipes in my large dutch oven.  It’s difficult to utilize normally since it makes such a large amount of food and typically camp with just 2-3 people.  I didn’t pick a typical recipe though, I opted to try a slightly modified pumpkin roasted rice recipe, which came out awesome.


20171123-1942-_DSC7988-

All-in-all, a good way to wrap up a solid few months of camping & travel.  There’s certainly been a good number of highlights:

  • Banff, Alaska & Green Tortoise adventures (breathtaking destinations with awesome people)
  • The southwest, several times (all I can say is, damn)
  • A chance to visit a number of national parks a second (or first) time, spending a few days to get to know the place
  • On the longest and last journey to the east coast, visiting a lot of old friends & family
  • Visiting new family now much closer by in Colorado!
  • A solar eclipse!
  • Other significant life milestones 🙂

Then, a few disappointments!

  • Bad ankle sprain beginning of year in March – definitely put a significant damper on the amount & intensity of hiking and other podiatrically-demanding activities
  • Arriving too late to the wildflower blooms at Mount Rainier – a nasty record-breaking heatwave hit the area with temps over 100, combined with a fairly significant dry-spell just destroyed the blooms.  Out of the entire Paradise area, there were 2 small spots with decent flowers.
  • But without question, the biggest one had to be the northeast fall foliage season.  The months preceding it were basically color-perfect weather.  As the September weeks progressed, the colors started to come slightly early, when suddenly (again) a record-breaking heatwave blasted through the region completely muting the colors.  What came after was weeks-delayed watered-down foliage color overall.  Here and there, a few small areas and trees put on a somewhat better show but generally it was a several-years worst foliage season.

You win some, you lose some, right? 🙂

110 nights in a tent!

20171110-1740-20171110-1740-_DSC0042-The Watchman

I am thankful to say that I have survived the journey.  It’s been a whirlwind of long hours, beautiful scenery, crazy weather and wild emotions these past 7 months.  After the final trip to Death Valley and Joshua Tree for Thanksgiving I can say 110 evenings (>30% of the year) in my tent have been an experience I will never forget.

I plan to do at least a few more posts now that I’m back, one outlining all the destinations over the year and another with some tips and pointers for anyone who may be interested on embarking on their own outdoor excursion.  But, to sum it up – it was a ton of fun and definitely more complicated then it seemed initially.  That being said, I wouldn’t change a thing much.  If this is any indication: a quick calculation determined that I’d need another 12 nights to hit 33% of the year, at which point I thought to myself “nah, I’m good”.

I can say that this year I’ve visited:

  • 13 US National Parks (first-time visit, +9 re-visit)
  • 3 Canadian National Parks (first-time)
  • 36 US States
  • Way too many miles on the road

I’m still working on counting mileage for the hiking/etc, but that will come later.

Firestarting 101

The process is easy, yet frequently misunderstood.  Fire needs 3 things: oxygen, fuel and heat.

Preparation for building a campfire:

  1. Use the right tools for the job.  Yes, a lighter can work.  But they frequently break, run out of fuel, etc.  Get a proper flint & steel, ideally with a magnesium stick.  And when I say proper, I mean not one of those $5 survival trinkets.  Get a flint several inches long, thick enough to not break and a good steel for striking and then PRACTICE using it.  I stumbled across the impressive FireSteel (apparently used by US Military, no affiliation), mine is 3/8″ x 5″ which is works amazingly well.  Since I don’t have a softbox stashed away in my camping gear, you get an in-the-field shot instead.

    LRG__DSC7746 copy.jpg

    Mas fuego

  2. Get an axe, preferably two.  I have a small tactical axe and it works well for simple jobs, but fails to split all but the smallest logs – even with a full overhead swing, there’s just not enough momentum to split anything decently sized.  A small, sharp one (similar to what I have) and a large, heavy log splitter would be perfect.  Oh, and learn to use these too.LRG__DSC7764 copy.jpg
  3. Prepare your fuel.  You will need a range of sizes of wood to properly prepare for a fire.  This is your tinder, kindling and larger logs.
    • Tinder is DRY, light and fluffy.  Something that is easily lit, not wet or compacted.  My preferred source is dryer lint and I have a ziplock bag full of it in my camping supplies.  I save it from doing laundry at home, or in a pinch run into a laundromat and raid all the dryer trays…  you might get a few looks, but it works.  Other examples include dried grass, wood shaving and certain types of bark.  This is the MOST important fuel.
    • Kindling is the size of smaller sticks, no bigger then a pencil.  I make mine with the axe: looking for sharp angles on the edges of firewood bundles, then hacking away to make various-sized piles of shavings from tiny matchsticks to cue-sized splits off of a larger log (this is used after the kindling).  DRY tinder should SNAP in half with your hands (as opposed to be wet and bending or too large to break with your hands)
    • I like to have slightly larger sizes as well, a minimal amount is usually required here.  Cue-stick to flute-sized pieces here.
    • The first few times you do this, sort these out into separate piles; it’ll make your job a lot easier.

Now prepare your campfire.  There’s many different styles and ways you can go about building it once it’s bigger, but start off simple.

  • Start with a pile of your DRY tinder (a bit smaller then a ping-pong ball if you are new), fluff it up and place on dry-ish ground, or even better on a single or between two logs.  Make sure air can get to it easily (not shoved underneath or tightly between other wood).  A way that usually works well is to lie a larger sized log in your campfire ring, then place the tinder next to it on the ground.
  • Bring your flint next to the tinder and strike!  This should be easy… you did practice, didn’t you?  If it doesn’t light either your tinder is wet, your flint (or you) can’t make a good spark, or your flint is too far away – it should be CLOSE so the sparks can easily land on the tinder while still hot and burning.  If things are prepared correctly, it usually only takes me a single strike to get it lit.
  • Gather your smallest piece of kindling (no bigger then matchstick) and lay on your burning tinder.  Small pieces and SLOWLY!  You do not want to suffocate the fire, which is very easy to do at this point.  Add a few of your smallest and wait until they light.  After a few seconds and they are burning, then add slightly larger but again be careful not to suffocate.  The fire is most fragile when it’s small.
  • Get to know the balancing act between feeding the fire enough to fuel to stay alive, but not smother it.  A trick I learned is to try and expose new fuel to as much heat as possible (close to the flames), but without laying it directly on the flames (this tends to suffocate it).  You can use other pieces of wood to prop up others you want to burn, which is why I suggested laying your tinder next to a large log, you can lay small pieces against the large log above the tinder and being close to the flames, but not directly laying on the tinder.  A small gap goes a long way.

That about sums up.  It may seem like a lot, but when you make fires regularly having the proper equipment makes the job simple.

117 to 27 on the Final Journey

So I’m in the midst of the final leg of my traveling journey.  As mentioned in a previous post, my plan was to head east for the fall foliage season in New England.  There have been countless wonders I’ve experienced living the past few years on the west coast, and rightfully so – there is an immense amount of diversity in the landscapes of the west. Many places are world-renown for the captivating beauty

However, if there’s one thing I miss it has to be New England in the fall.  I spent several seasons on Columbus Day weekend trips up there and enjoyed every one.  Yes, we have fall foliage in California’s Eastern Sierras.  And while they are beautiful in their own right, with the rugged peaks (snow-covered if you’re lucky) and the occasional orange & red aspen, the color does not compare to the hardwood forests of New England.  I joined some friends on a Vermont skiing trip one recent winter, but have not been back for the fall since moving out west.

My plan was to swing through the southwest, visiting a few new places en-route, spend a bit of time in Colorado checking out early color, then beelining it to New England for the beginning of the season there.  But before I left, there was one final camping trip to Tahoe over Labor Day weekend.  We had an unbearable heatwave those few days, with San Francisco (and a few other places) hitting all-time highs, 100+ degrees in the city is unheard of. Locals and frequent visitors know the city is typically 55 and foggy most of the summer, with some warmer temps in the 70s during September/October.  My car reported 117 driving through Livermore on way to Tahoe that Friday evening, and areas around the lake were around 90 that weekend.

After that, I expected my experiences with summer heat to be done for the year.  Little did I know…

A few days later I departed on my final journey.  It was a blast.  My first stop, the Grand Canyon was quite impressive.  And cold!  The North Rim got down to 27 by the morning! Some crazy thunderstorms and hail on the way too.  Next up was Monument Valley, which was nice but definitely harsh and unflattering light during the middle of the day. One of my cousins recently moved to western CO, so she met up with me that night in Canyonlands NP.  Pretty awesome place.

There were many other areas in the desert I wanted to hit up, but by that point I was reading about “early foliage” starting a bit sooner then expected in New England.  I had missed the perfect conditions for wildflower blooms on Mount Rainier by a few days earlier that month, so I wasn’t planning to spend too much time.  My cousin and I spent another day driving through the San Juan’s, seeing some awesome early color there and then up through Grand Mesa NF.  After crashing the night at her place, I headed up to Steamboat area for a night, then a night camping in Rocky Mountain NP.  There was some great color west of RMNP, between there and Steamboat.  The following day, I hit the highway and headed east.

It seems that I made another rash decision in hindsight. I arrived to western NY to another several-day heat wave, 90’s and the oh-so-lovely humidity I so desperately missed from the east coast.  While there was early color, it was significantly muted and dull, not to mention extremely hazy.  On top of that, there was early snow in Colorado and I missed an opportunity to capture colorful aspens across snow-covered mountains! Sigh…  It’s finally cooled down and while the early color is basically done, I’m hoping that the large amount of remaining greenery will kick into gear and bring us some beautiful, vibrant color.  Looks as if the concern over missing part of the season was for naught! And while some of the color was impacted, there’s a possibility that if the heat wave didn’t happen the conditions could have been worse – the upper level ridge causing the heat also did a great job of blocking Hurricane Maria from getting quite close to the area!

We will see…


Traveling, Research & Planning

I wanted to make a post about tips and tricksies I’ve learned in my travels over the years, specifically the past few months.  Pretty high-level here, aiming at relatively inexperienced travelers that are willing to rough it out.  I’ll add in a few notes for my specific current destination – New England.

Preparation tips

  1. Do research and determine your “hotspot” areas – this is a list of your must-see spots. Learn a bit about them, and more importantly where they are from a geographical perspective.
  2. Get a good road map for your destination area.  The Delorme road atlas ones work pretty well.  This is for those guaranteed spots where you will not have reception.
  3. As a second/backup option to #2, download Google map offline data for your destination.  You can do this within the mobile app (Menu, Offline maps, Select your own map, then zoom to an area large enough to cover your region)
  4. Find lodging along your routes/areas, assuming you’ll be doing more then a day-trip.  I typically camp as it’s 1. cheap & 2. relatively-easy to find last-minute.  If you are sleeping in a car and not bothering with tenting, then just finding a pull-out or remote area will typically work, especially if you are in BLM land (which is plentiful in the west; you can “dispersed camp” anywhere on BLM land).  I prefer established campgrounds myself to have a picnic table, a fire ring and in many cases showers.

Once you have done the above research/prep tips, the most important tasks are done. But to make things easier, I’d recommend doing a few extra steps.  You don’t have to do any of these, but having at least one definitely helps.

  1. Add the above data to Google maps.  This is most easily performed via the Google maps website.  You can add destinations either as “starred” items (these will appear under “Your Places”, then “Saved”), or a custom map (“Your Places”, “Maps”, “Create Map”), or a combination of the two.  Be aware that any custom maps are not available offline (without a data connection), but saved/starred places will work offline.  It is your choice, I generally do a hybrid approach with both – creating scenic drives with custom maps, then must-see items as starred.  I find it easier to look at a broad zoomed-out map with a list of drives highlighted, but the no-offline access is a challenge.  You can alternatively take a screenshot to save when there is no access, of course you can’t zoom or navigate around but it’s better then nothing.

    Screenshot_20170925-084521

    One of my custom maps

  2. Add the above data to your road map/atlas.  This has the benefit of being fully offline and free of any electronics.  You’d have to mark-up the map though, so might want to double-check before doing on a map you borrowed!
  3. If there will be a lot of driving, make a playlist or even better download some audiobooks to your phone!  I’m a big fan of audiobooks on road trips, especially interesting fictional epics as they help to distract you from the miles passing by. Smart AudioBook Player is an excellent Android app for this, I’ve heard you can use iTunes on an Apple device but have never tried.
  4. If you plan on doing an extended road trip (requiring charging multiple electronics), I’d recommend making a charging “station”.  An 12v car inverter, pegboard and some zipties will handle the job and having this set up makes your job much easier.   Charge when needed, or have 2 sets of batteries for each device, leave one in the charger.  My car is designed to have constant power to the 12v cigarette outlet even when the ignition is off so I can charge at any time, and I’ve tested that doing so overnight does not drain the battery.  YMMV.

    LRG__DSC7710

    Camera, NiMH AA/AAA, cell phone & laptop chargers

Other tips: location/time-specific

  1. If you are going to an area towards beginning or end of a season, double-check any seasonal lodging windows – especially campgrounds.  Many shut down in fall to be winterized, or open later in the spring.
  2. Getting an idea of the weather will help too (eg: going to New England in the fall, make sure there are no hurricanes heading up the coast!)
  3. If you want to get a bit specific for photo ops, look at a map and figure out which direction the light will be in various times of the day (eg: don’t shoot a barn/church when it’s in a shadow).  Optimize your route to hit places at the right time.
  4. If you happen to be heading to New England, these lists of campsites will help!
    1. https://campvermont.com/map.html
    2. http://www.ucampnh.com/find-a-campground/https://www.google.com/maps/d/viewer?hl=en&authuser=0&mid=zFgu-xxyD9E4.kk_G7g2CWDDI
    3. And of course, https://freecampsites.net/

Fall Foliage Forecasting

My favorite time of year is the fall… not only due to the great weather, Halloween and Thanksgiving but of course the colorful foliage as well. There’s a number of great locations across the country (and world for that matter) to take in the beauty of the changing colors. Over the past 2-3 years I’ve become more familiar with the areas locally to me in the Eastern Sierras. I’m hoping to get a glimpse of some of the awesomeness of early fall in Colorado this year. But in my opinion and maybe because I’m slightly biased, I don’t think anywhere beats New England. It may not have the backdrop of 10k’+ snow-capped mountains, which can certainly be stunning and worthy of it’s own pursuit. However, what it lacks up for in high-elevation jagged mountain peaks it makes up for with a stunning array of color, during a good foliage year at least.

I’ve been photographing fall foliage for several years now and very excited to have my first trip to New England during the fall since I moved to the west coast over 4 years ago. Even more exciting is that the potential for a good display is working in my favor, from the reports I’ve read. No drought conditions, good supply of moisture earlier during the summer. If we generally have sunny days, crisp nights and avoid any big wet & windy tropical systems tracking up the coast it could work out very well. I’m tracking the weather rather carefully, of course.

I’m also gathering information from a number of sources and wanted to share some of my input on what I’ve read. Some of them are quite useful, some I think a bit less so.

My personal favorite has to be Jeff “Foliage” Folger’s excellent New England Foliage blog. He provides a litany of useful information on all things fall including foliage forecasts/reports, locations, scenic drives, and more. I only found it while I was living out west, so haven’t gotten a chance to “use” any of the forecasts & reports yet but his dedication and great data resource has made my planning job much easier.

Another favorite that I’ve been using for over 10 years is the forecasts at The Foliage Network  From what I’ve seen their data is pretty accurate, and detailed.  It has reports only (no forecasts), but they cover a few geographical regions and provide useful maps.

A third resource is the interactive and impressive national foliage prediction map by Smoky Mountains. I was quite excited when I first saw this during the planning stages of a trip. But once I looked a bit further, the forecast seemed to be jumping the gun a bit with early peak dates based upon the two years I’ve seen so far. This year they are predicting conditions that I know are unlikely in the northeast (eg: the whole of Vermont and New Hampshire are not past-peak by the first of October). I wish I could pull up an archived page with last year’s data on it for comparison to my Eastern Sierra trip as a second data point.

I also stumbled across the reports at New England Today, and at an initial glance they seemed quite detailed. However, once you look a bit further the data was noisy… at the time I first checked, it listed a few regions marked as peak that were surrounded my regions still green, which doesn’t make sense. Since then the data seems to have been validated or cleaned up, which is great to see. This does bring up another point though…

What is peak? How do you define peak? Is it when one tree on a hillside as at “ideal” color? Or is it a majority? 20%? 30%? You know not all of the trees in an area change at identical times, local temperature variations, species, health all play into that. Furthermore, who’s to say the cutoff’s between the various foliage progression labels such as partial and near peak are similar.

I find that talking a quick search on Flickr and limiting results to the past week or so can provide some very useful data as well with a bit of luck.


Eclipse Photography

20170821-1022-_DSC0710_DSC0719-moon-

Quick note about the photography experience and lessons I learned during the recent eclipse.

Starting with the basics.  In order to capture good detail in the corona, you’ll need a long lens and solid tripod.  Around the order of 500-600mm or so is good (on a full frame camera), you don’t want too long as the corona extends out quite far from the sun.  I used my Tamron 150-600 and it worked beautifully, in combination with a 3-series Gitzo.  If you wanted to focus on prominences, diamond ring or other smaller details you could use a longer lens.

Secondly, if you want to capture the partial eclipse (anything not in totality), you’ll need a filter of some sort.  I’ve read ND filters are not ideal as they typically aren’t strong enough and stacking several just adds more layers and reduces the IQ further, plus not safe for viewing through an optical viewfinder (any SLR camera) since they aren’t ISO certified.  A dedicated solar filter is the right choice here.  However, a proper glass filter isn’t cheap and likely something you won’t get a ton of use out of so I avoided that route and instead made my own from scratch at 1/5th the cost with an astronomy-grade solar film (ND 5.0, ISO 12312-2:2015 certified, etc).

I mounted the film to the lens using form/poster board and the great directions outlined by Joe Cali.  Process was pretty simple and straightforward.  There’s also terrific information provided by MrEclipse/Frank Espenak on general eclipse information, including how to photograph.

As mentioned above, you’ll use the filter to photograph any partial eclipse, and then once totality happens you remove the filter quickly and shoot more.  You have to be fast as totality is *quick*, certainly feels much less then the usual 1-2 minutes.  I also tried to make sure I spent a few moments enjoying the experience rather then just playing with the camera the entire time.  You’ll also need to bracket as the dynamic range of the corona is rather extensive.  I think I ended up using around 9 different exposures merged together in Photoshop (details to follow).  If you check out Frank’s exposure guide for solar eclipses you’ll see that different solar features require different exposures.  I had a bit of difficulty capturing Baily’s Beads as they are very bright, change quickly and visible for a *very* short period of time (a few seconds right before & after totality), but managed to get something usable.

I also tried a wide-angle view with a landscape in the background and a composite image during the sequence.  This was pretty trivial to do, as it didn’t require a filter or any special care (the sun occupies a small part of the image and really no different then regular daytime photography shooting into the sun).  However, I didn’t do a ton of planned research on locations as I was more focused on the telephoto shots and the dried-up field I shot it in wasn’t particular interesting.

In terms of processing, the best method I found is similar to common techniques handling Milky Way images.  Generally, you open the various exposures as layers in Photoshop, combine into a smart object then adjust the stack mode.  Some massaging of the smart object in camera raw plus a curves layer or two should be all you need to get great corona detail.  A friend pointed me as this video tutorial which helps summarize things rather well.

The image at the top of the post is a composite using this technique with a few modifications.  I wanted to try making a composite eclipse image combining a solar with a lunar eclipse (using photos from a previous shoot) to bring up more detail in the moon itself.  It took a little bit to balance things but think it came out fairly decent in the end.  My favorite part of the images I captured were the prominences, there weren’t many during a period of low sunspot activity but being new to eclipse photography I was excited to see them in my images!

That about sums it up.  The experience was awesome, in every sense of the word.  I can’t wait to see another one in a few years!